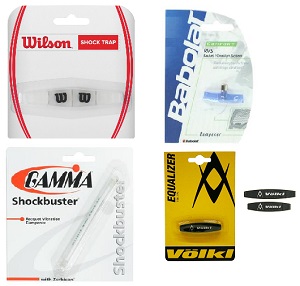
Ever had trouble installing some of those pesky dampeners on your racquet? Well this simple video helps show you how to install those challenging dampeners with relative ease. There are many different dampeners available, some easier than others as well as those that actually have to be installed while the racquet is being strung.
First up in the video is the Wilson Shock Trap. This dampener is one of the more easily installed dampeners in this video. To install, simply locate the “back” of the dampener, there is a piece of the dampener that connects the four segments together that will identify the front from the back. To install, simply do one section at a time, pulling the strings apart; the front side should be closest to the string bed.
 The Gamma Shockbuster can be a pain to install but it’s hard to do it wrong. What I mean is that no matter how you start it, as long as you weave it between all the strings and finish with the dampener evenly spaced on the string bed, you’ve done it correctly. The Gamma Shockbuster II has the exact same installation instructions, but it is only slightly more difficult do to the additional width of the dampener.
 Last in our “How-To” video is the Babolat RVS (Racquet Vibration System) Dampener. This dampener was designed by Babolat to dampen both the vibrations from the frame as well as the vibrations from the stringbed. In the video we only showed how to take the RVS on and off (it’s easier to take off further from the frame), but as you can see on the packaging, the dampener was designed to come in contact with the frame itself. Our customers have found the Babolat RVS dampener particularly difficult to install. To install this, you have to first insert it perpendicularly to the center two main strings. After this, you just twist the dampener counter-clockwise and that will get the two center mains into their slots. The outer two slots then just need to have the string pulled off to the side and then slide on. Lastly, simply slide the dampener down so that it contacts the frame and you’ve installed that pesky dampener!
 The Last dampener we have wasn’t included in the video, but it should at least be mentioned. This particular dampener could ruin your day, not for being difficult to install, but because they come in two different sizes. This dampener comes in an “open” and a “closed” string pattern style. The longer of the two, depicted above on the top right, is designed for open string patterns (16 mains by XX crosses). The one below it is designed for a closed string pattern (18 mains by XX crosses). The trouble with these little guys is that you could install an “open” style dampener on a “closed” stringbed, however, it would be difficult to install and almost impossible to keep on. So when it comes to the Volkl Equalizer, take care to not what racquet you have and what dampener you’re buying.
Check out our full line of accessories as well as other dampeners at TennisExpress.com!


